Showing posts with label sewing. Show all posts

Sunday, October 30, 2011

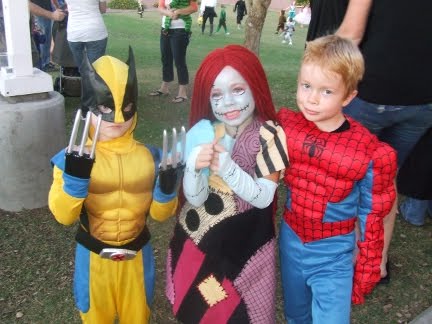
Sally from Nightmare Before Christmas

I wish I would have had the foresight to have taken pictures of this project along the way, but I'm just lucky to have finished it before our church Trunk-or-Treat on Saturday!

My daughter wanted to be Sally Stitches, so I went straight to work on this elaborate costume! It took me longer than I thought it would. First, I made a dress out of muslin by tracing the shape of one of my daughter's existing dresses. I looked at plenty of pictures of Sally online to see just what her dress looked like. I had most of the fabric on hand, but I ended up buying some corduroy for half off at Joann's to fill in the gaps and add some texture. I drew the shapes directly onto the muslin and cut pieces to fit out of the different fabrics. I used some Heat and Bond to attach the different pieces to the muslin dress. Then I zig-zagged around each different piece to secure it.

Next I took some black yarn and a needle and stitched marks around each of the pieces. This took me a while. I cut the sleeves and painted black lines on the yellow one with fabric paint. I attached the sleeves to the dress last.

I made the wig with two skeins of thick rust-colored yarn. I could have just sprayed her hair red, but I really thought that the yarn wig would look cool. I cut the two skeins into long strips, then carefully sewed them right in the middle onto a leftover piece of thick interface. Then I sewed a piece of elastic to go around her head and attached the interfacing to it in the front and the back. I added some elastic to the sides as well, so it wouldn't slide from side to side. If you are interested in seeing how I did it, I can take some pictures.

Last, I made the legs and arms. I dyed two pairs of white tights to a light blue color. I then cut some cardstock into strips and fed them into the legs so I could paint the stitches on. I just used puff paint and they dried really quickly. Then I flipped them over and did the other side. For the arms, I cut the legs off the tights and cut holes for her fingers to go through.

We used NYX Baby Blue Jumbo Eye Pencil and Cool Blue eye shadow for her face and neck. I put some pink eye shadow on her eyes and used an NYX white Jumbo Eye Pencil for under her eyes. I used a black eyeliner for the stitches. We finished her off with mascara and pink lips.

Monday, August 15, 2011

A New Quilt

School is back in session for us here in Arizona, and I have been so ready! We have had a fun summer. I haven't sat at my sewing machine once since it started. It was nice to have a break.

I decided to do something with a stack of rainbow squares that I had from a friend's swap. I had 200 different squares, but instead of them being I-Spy prints, they were just a nice spectrum of color. I didn't know what to do with them, and I didn't want to do another patchwork, so I decided to try Crazy Mom Quilt's zig zag quilt. I loved her tutorial and found it super easy to follow. Plus, it yielded such great results! And this would make a great I-Spy quilt for I-Spy fabrics with smaller objects on them.
I wanted to map out the colors in kind of a mosaic look. I didn't think I liked it at first, but I think I really do now. Now to just add sashing and borders and send it off to be quilted! I will have to post the finished quilt when I get it back.

By the way, would anyone be interested in participating in a swap for colored fabrics like these?

Thursday, April 28, 2011

A New Rag Quilt!

I have been working on this rag quilt for some time now, and I'm glad it's finally finished! It wouldn't have taken so long, but it got put on the back burner for a long time. I am so happy with how it turned out, and I can't wait to enjoy this cuddly quilt!
It was made with all flannel material and one layer of Warm and Natural batting in between. I love the colors and the cute (but not obvious) Christmas theme. It can be used all year round!
You'll notice that the pattern on this quilt is different, using large and small squares. I wish I could take credit for this design, but I actually found a pattern for this from Quilt Country Patterns. You can buy it here, here, or here. Or if you are ambitious, you could figure it out on your own :)
Snowmen in Arizona? A girl can dream...Click here for my Easy Rag Quilt Tutorial!

Sunday, March 27, 2011

YW Mini Table Runner

This table runner was inspired by this one from The Polka-Dot Chair. I wanted to make something that I could use during lessons or for other Young Women functions. I tried to find cute fabrics with bright, vibrant colors rather than the usual boring and dated pastels. I think the colors look so cheery! The lady who cut my fabric probably thought I was crazy to pair all of these random non-matching colors, but it's really hard to find fabrics in eight different colors that coincide.

I bound it with a gray and white stripe and backed it with white Kona. It's pretty short, and in fact, I might make another one with larger pieces of each color, like the one on The Polka-Dot Chair.

Sunday, March 20, 2011

Opinions, Please!

Okay, I am making a skirt for my daughter using this pattern (buy here):I chose this for the top fabric (it actually looks a little darker than this):I originally bought this for the underskirt. I know it's from a different line and it actually doesn't match perfectly (or maybe at all) but I liked the effect at the time. I also have a piece of this fabric that I could use as the underskirt. It's from the same line as the first one, so the colors match and everything. I just think it might be way too crazy of a print.
I didn't want a stark contrast between the colors of the two skirts, but now I'm thinking that the top is really busy and with either of these, the bottom might be too busy too. The red one doesn't really help with my desire to not contrast too much. I also don't want the fabrics to be too matchy-matchy. That's why I chose fabrics from different lines at first. I am one of those psycho people who match too much and my sisters have convinced me that sometimes not matching actually looks better, and I agree. I am trying to become more open minded with matching!

So which should I use, or should I just go buy a monochromatic print on yellow or light blue or something? I'm having a hard time deciding. Your thoughts?

Thursday, January 13, 2011

I-Spy Quilt!

For those of you who were in I-Spy Swap #1, you will recognize these squares! I wish I could take credit for this beautiful quilt, but this is the work of Yvette, who participated in the swap. She emailed these pictures to me and I wanted to share them. Yvette says she calls this quilt "The Road to Grandma's House." The quilt is 59 x 62 without a border, and she said it took her about a week to do. I just love it, and I know Yvette's grandkids will too!If any of you want me to post your I-Spy projects, let me know! Or if you have a blog, I will link back to it. It's fun to see what everyone comes up with. As for me, I made another I-Spy quilt, this time for my sister, almost identical to the one I made before. I saw the design on Crafterhours. I still have plenty of I-Spy squares left from Swap #2, and I'm sure I'll figure something out! In the meantime, I picked up a jelly roll, a layer cake, and some extra yardage of Moda's Dream On, which I have been eying for a while and I just love! It reminds me of the sheets I used to sleep on in the 80's! Another quilt?

Wednesday, December 8, 2010

Rag Quilt FAQ

I have been asked a lot of questions about rag quilts, so I thought I would answer them all in one place.

The most often-asked question I get is
How do you cut your quilt?


I am not a quilter. Can I do this project?
Yes! The great thing about this quilt is that you can make mistakes and no one will be able to tell! It is a great project for a first-time quilter, so don't be intimidated. Give it a try!

Is this a time-consuming project? How long will it take?
This project can be time-consuming if you are new to sewing, but once you get going, you will get the hang of it and will be able to crank these blankets out like nobody's business! One reader said that she finished her quilt in about 20 hours.

Do I have to use flannel?
You can use whatever fabric you want. I would recommend something that will be soft, such as flannel, cotton, denim, chenille, or Minkie. You can even use a combination of fabrics. For instance, I have used cotton on the top and two layers of flannel on bottom, omitting the batting. You could also do demin on the top and flannel on the bottom. Cotton offers lots of options for colors and patterns and it washes nice and soft, so that is a great option. If using denim, you might want to use a stronger needle and thicker thread. I wouldn't recommend using knit fabric.

Can I omit sewing the X in the middle of the squares?
I wouldn't recommend omitting the X in the squares because that is what holds them together. If you do small enough squares you *might* be able to get away with omitting the Xs, but if it were me, I would still sew them.

Do I have to do a 1-inch seam allowance?
No! I wouldn't use a larger seam allowance than 1-inch, but you can definitely use 3/4 or 1/2-inch seam allowances if you want. The squares will appear bigger and the seams will be less fuzzy. This is a good option if you are concerned about excess fuzz in your washer or if you want to maximize your fabric.

Do I have to use batting?
No! You can omit the batting. With two layers of flannel, the blanket might be heavy enough for your liking. If you want the blanket to be thicker than only two layers of fabric but think the batting is too heavy, try three layers of flannel with no batting. Also, you would not have to cut the middle layer of flannel smaller than the top and bottom layer, like you have to with the batting option.

Will washing the blanket clog my dryer?
No, just make sure you clean out the lint filter before you dry the quilt. It will need to be cleaned out afterward as well.

There are fuzzy pieces all over the quilt, even after washing.
There are going to be fuzzy pieces. That being said, one way you can reduce the fuzziness is to reduce your seam allowances. You also might want to wash the blanket more than once. If you still have problems, just take a lint roller to it.

Should I pre-wash my fabrics?
Will the fabrics bleed?

Will my blanket shrink in the wash?
You can certainly pre-wash your fabrics if you want to. If you are concerned about shrinking, go ahead. I never pre-wash my fabrics and haven't had a problem yet. If you are concerned about the colors bleeding on each other, you may want to pre-wash. I always throw a Shout Color Catcher in the washer when I wash a quilt for the first time. If you are using cotton, denim, or flannel, you can expect a little shrinking.

Can I make a different pattern other than diagonal?
Yes, definitely. It will take some figuring out, but you can make a solid-colored border around the edge, or even do the whole top one color if you choose. I usually make mine in the diagonal pattern shown in my tutorial, but if you want it to look different, go for it! Just lay it out before you start sewing and make sure you sew the seams out so the right fabrics are on top.

How did you make the quilt shown in the video, with smaller and larger squares?
The answer is in this post.

I want to make a bigger blanket. How do I figure out how much fabric I need?
The blanket shown on my tutorial is a great size for little kids, toddlers, and babies. But you can definitely make a bigger quilt. Each of these blankets is made with 8-inch cut squares.

Baby blanket (shown in tutorial):
38 inches x 50 inches
a total of 48 sandwiches
6 squares across x 8 squares down
2 and 2/3 yards patterned fabric, 1 and 1/3 yards each of two other coordinating fabrics.

Larger Blanket:
48 inches x 72 inches
a total of 96 sandwiches
8 squares across x 12 squares down
5 yards patterned fabric, 2 and 3/4 yards each of two other coordinating fabrics.

Standard Twin:
70 inches x 90 inches
a total of 130 sandwiches
10 squares across x 13 squares down
About 6 yards patterned fabric, about 3 yards each of two other coordinating fabrics.
*Use a 1/2-inch seam allowance for a Twin quilt. Your squares will end up being 7 inches instead of 6 inches*

Hope that helps, and have fun sewing your rag quilts! They are easy, fun, and addicting! Feel free to send any other questions you may have my way. Leave a comment or send me an email. Thanks for using my tutorial!

Saturday, November 20, 2010

The Lydia Dress

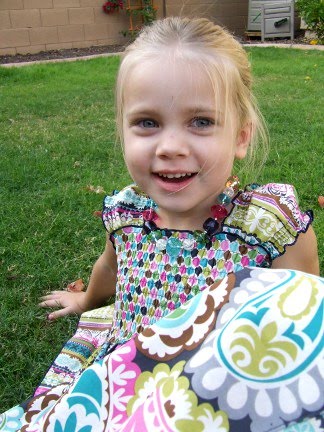
I have had this pattern lying around for over a year. I even bought the same fabric the model's dress is made of. After reading through the pattern , I decided I wanted to wait until I had a serger. Well, I got one about 6 months ago, and it has been sitting on my desk collecting dust because I didn't have time to figure it out. I have heard nightmarish tales of how hard sergers are to figure out and thread. Well mine must be really user friendly, because it didn't really take that long! And I'm so glad I finally set it up. I am going to get some good use out of that thing; I have been putting certain projects on the back burner because of that until now!

So the first thing I wanted to do after setting up the serger was to make this dress. I was thinking about saving it for Christmas, but I already got my daughter two dresses for Christmas, and the child may want more than dresses. Besides, I kinda couldn't wait :)
I needed the serger so I could do the rolled hem. You can fold it up and sew it, but I thought the rolled hem looked much cleaner. I also opted to eliminate the apron on the front. I like the simple look with these fabrics.
It was my first time shirring! I have to say, shirring is very satisfying. It was pretty easy to do, even though it was hard to sew straight on the last few rows. Very fun!
I also made a little matching necklace and bracelet (not pictured) to go with the dress. I'm going to be making *at least* one more of these dresses. I was really simple and easy, and you know me, I can never make just one!

Friday, September 17, 2010

Come Join My I-Spy Fabric Swap!

Okay, we are all full!

Don't worry if you didn't get in; we will do it again sometime! For those of you who are participating, I will be shooting you an email soon with all of the details. This is going to be fun!
I participated in an I-Spy fabric swap over at Obsessively Stitching a while ago. It was so much fun, I thought I would host my own swap!

First a little note about I-Spy fabrics and what you can do with them. I-Spy fabrics are generally novelty prints which are then fussy-cut. You can use the squares of fabric for so many things! Look at Care's great ideas here and here. I used the squares from the swap to duplicate this beautiful quilt from Susan at Crafterhours. I am more than thrilled with the result. We have played I-Spy with our quilt and have used it to curl up on the couch with. I am so happy with the result. Here it is!
My kids love playing with it!
So on with the swap!

The Basics:
Mail me 200 I-Spy squares by October 11th.
Get back 200 squares, all different, by October 31st.

The Details:
1. I need 17 people to join the swap. In order to join, just leave a comment with your email address included. (If you are not located in the USA, please send your fabrics a little earlier than October 11th.)

2. Cut 20 4" squares out of each of 10 different novelty print fabrics (quilting quality cotton wovens - no flannel). A 1/4-yard cut or fat quarter will get you 20 4" squares, so you will be purchasing a total of about 2 1/2 yards of fabric. This is NOTHING when you consider all of the fabrics you will be getting back.

3. In order to avoid duplicates, everyone will need to search out unusual or obscure prints. Look for things that aren't available at chain stores like Walmart, Joann's or Hobby Lobby. Pick fun prints that you love!

4. Remember that we are looking for fabric with objects on it, not printy-prints. (A fabric with FLOWERS on it is very different from a FLORAL PRINT.)

5. No "licensed" prints: No Disney, Spongebob, Dora, John Deere, L.A. Lakers, etc.

6. Remember seam allowances! Be sure you can tell what you are looking at within a 3 1/2" x 3 1/2" square. Nobody wants only half of an object in their square -- cut them well! (Depending on your fabric choice, you may need to buy more than 1/4 yard in order to get an object into each cut square.)

The first 17 people who comment here will get to participate!
Please leave your email address in the comment so I can fill you in on some of the details of the swap. Also, feel free to forward this on to any friends you have that might be interested in joining us!

Monday, February 1, 2010

Easy-Peasy Personalized Pillowcases Tutorial

I made these for my kids for Christmas and they loved them! These would also make cute personalized birthday presents. They are so simple and fun to make, you might get addicted like I have!

You should already have most of the stuff. Here's what you will need for one standard size pillowcase:
1/4 yard white fabric- I prefer 65 poly/35 cotton blend. It's really cheap and holds up well.
up to 1 and 1/4 yard patterned fabric- So far I have chosen licensed prints for my kids, but anything will do. Read my note* before buying your fabric.
small piece of freezer paper- you can buy a roll at Wal-mart in the foil and baggie section.fabric paint- I like Tulip brand. It goes on nice and thick and I rarely need more than one coat.
X-acto knife
piece of leftover cardboard
paintbrush
cutting mat and rotary cutter
sewing machine
thread
iron/ironing board
your computer and printer

*A note about buying fabric
One thing to note is that you want the pattern on the fabric to appear horizontal after the pillowcase is sewn. The last thing you want is your Care Bears looking sideways. How much fabric you will need will depend on how the pattern comes off the bolt. For example, if the pattern comes this way, you will need 1 and 1/4 of a yard.You will need 3/4 of a yard if the fabric comes off the bolt like this...
The reason for this is that we are going to cut one large piece that will be folded at the top. Once folded, we will have the horizontal patterned piece of the pillowcase. We want it to look like this:
NOT THIS:
So keep that in mind while buying and cutting your fabric. If the fabric you have chosen can face either way or doesn't have a distinct horizontal pattern to it, you can just buy 3/4 of a yard.

That's it! Let's start. Set up your ironing board and plug in your iron. We will be using a 1/4 inch seam allowance for the whole project.

Cut a 26.5 x 38.5 piece from your patterned fabric. Set that aside.
Cut an 8.5 x 38.5 piece from your white fabric.

Fold the white piece in half longways and press; then fold it in half the other way and press. Now you know where the center is.

Get on your computer and find a cute font to print out your kid's name with. If you don't have any fonts you like on your computer, go to Kevin and Amanda's free fonts site and you're sure to find something cute. Open up a word document and enlarge your name so that it's no taller than 4 inches. That includes tall letters like lower-case d, h and l. Go to format in the menu bar and then choose character and chose the outline feature. That way when you print out the name, you won't use up your whole ink cartridge; it will just print a nice outline for you. Like so:
Trace the name onto a piece of freezer paper with the shiny side down. Using your X-acto knife and cutting mat, cut out the letters on the paper. Try not to make any extra slices because the fabric paint will end up seeping out of the stencil. Don't forget to keep any inside pieces like the loops in the letters e, p and d. You will need them! For really great and thorough instructions for freezer paper stenciling, check out Dana's tutorial at Made.
Center the stencil onto one side of the white fabric and then iron it on. Note: If you want the name to appear on a certain side of the finished pillowcase (right or left) you will need to put the small fold up and the long fold at the bottom of the name. For example, for the name to be on the left side of the pillowcase, you will place the name here:
The fold of the fabric should always be underneath the name. There will be no seam allowance on the fold, so you can place your name as close to the fold as you like. I like to keep in about 1/4 of an inch or more from the fold. If you want it centered from top to bottom, just remember that there will be 1/4-inch seam allowance on the top.

Place the cardboard under the fabric so that paint won't seep onto the rest of the fabric. Paint on a nice layer of fabric paint and let it dry for 3-4 hours. If you think it needs another layer of paint, go ahead and do that and let it dry again.

When the paint is dry, peel off the freezer paper. Doesn't it look pretty? Cover it with scrap fabric and press for a few minutes. Make sure to fold the white fabric lengthwise again if you unfolded it during the painting process. Now put the white and patterned pieces together (the matching 38.5 length sides), right sides together, (raw side of the white) and pin well. The name will be hidden as you sew. Sew the 38.5 inch length (remember all seam allowances will be 1/4 inch). Zig zag over the seam allowance. Now iron that seam up towards the colored fabric.
We're going to topstitch on the colored fabric just above the seam line, a little less than 1/4 inch so as to catch seam allowance underneath that we just ironed up. Not perfect, but it's okay!
Almost done! Can you believe how easy these are? Now fold the pillowcase in half, right sides together, pin it well and sew it closed. I start sewing where the white fabric is to keep it even. Zig zag your seam allowance. Inside it out and press. And you're done!

Sunday, January 31, 2010

I'm Back, With Another Twirl Skirt

Well, I figure I have taken a long enough break from posting on this blog! I wanted to enjoy the holidays without stress or distractions, so the blog was the first to go. I am happy to report that our holidays were great! It appears to have taken the full month of January for me to recover.

Anyway, I made another Twirl Skirt for my daughter, using these adorable matching fabrics I found at Hobby Lobby! I just fell in love with the colors and patterns. This time I decided that she needed a shirt to match, since the busyness of the skirt might look funny with just a plain shirt for the top. I gathered a strip of the fabric I used for the bottom stripe to make a little tuxedo top to match. I gathered two strips of black lace for underneath the fabric, then I sewed them all onto the shirt. I added three black buttons as well. I am happy with how it turned out, even though it's far from perfect. I highly recommend tear-away stabilizer for sewing onto t-shirts!

If you haven't made an Edith Twirl Skirt, I recommend you do! They are so fun.