Showing posts with label clothes. Show all posts

Saturday, November 20, 2010

The Lydia Dress

I have had this pattern lying around for over a year. I even bought the same fabric the model's dress is made of. After reading through the pattern , I decided I wanted to wait until I had a serger. Well, I got one about 6 months ago, and it has been sitting on my desk collecting dust because I didn't have time to figure it out. I have heard nightmarish tales of how hard sergers are to figure out and thread. Well mine must be really user friendly, because it didn't really take that long! And I'm so glad I finally set it up. I am going to get some good use out of that thing; I have been putting certain projects on the back burner because of that until now!

So the first thing I wanted to do after setting up the serger was to make this dress. I was thinking about saving it for Christmas, but I already got my daughter two dresses for Christmas, and the child may want more than dresses. Besides, I kinda couldn't wait :)
I needed the serger so I could do the rolled hem. You can fold it up and sew it, but I thought the rolled hem looked much cleaner. I also opted to eliminate the apron on the front. I like the simple look with these fabrics.
It was my first time shirring! I have to say, shirring is very satisfying. It was pretty easy to do, even though it was hard to sew straight on the last few rows. Very fun!
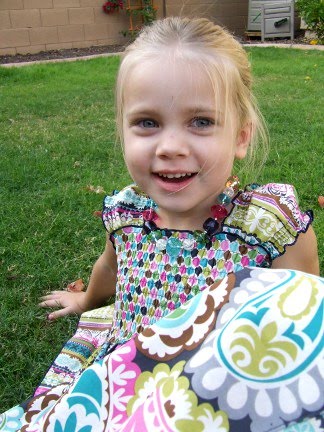
I also made a little matching necklace and bracelet (not pictured) to go with the dress. I'm going to be making *at least* one more of these dresses. I was really simple and easy, and you know me, I can never make just one!

Sunday, January 31, 2010

I'm Back, With Another Twirl Skirt

Well, I figure I have taken a long enough break from posting on this blog! I wanted to enjoy the holidays without stress or distractions, so the blog was the first to go. I am happy to report that our holidays were great! It appears to have taken the full month of January for me to recover.

Anyway, I made another Twirl Skirt for my daughter, using these adorable matching fabrics I found at Hobby Lobby! I just fell in love with the colors and patterns. This time I decided that she needed a shirt to match, since the busyness of the skirt might look funny with just a plain shirt for the top. I gathered a strip of the fabric I used for the bottom stripe to make a little tuxedo top to match. I gathered two strips of black lace for underneath the fabric, then I sewed them all onto the shirt. I added three black buttons as well. I am happy with how it turned out, even though it's far from perfect. I highly recommend tear-away stabilizer for sewing onto t-shirts!

If you haven't made an Edith Twirl Skirt, I recommend you do! They are so fun.

Thursday, May 28, 2009

Edith Twirl Skirt

Isn't this skirt fabulous? Thank you to Kayleen for introducing this pattern to me! You can buy the Edith Twirl Skirt pattern here.

This looks like it might have been hard, but it really was an easy sewing project; it just took a while for me. But that's because I have three little ones distracting me from my sewing! Darn kids, right? I think that the embroidery at the bottom was actually the most time and brain-consuming piece of the project.
I think I might work on a shirt to match this skirt. If I do, I'll be sure to post it later.

The pillow cover tutorial is still coming!

Friday, April 17, 2009

Bandanna Skirts

I found this great tutorial from V and Co. on how to make a girl's skirt out of a bandanna. I thought these would be great for the 4th of July with red or navy blue bandannas. I made a black and red skirt and a navy and red one. I also added a little ruffle using a 6-inch spool of white tulle. I just folded a long strip in half twice (longways) then sewed a gathering stitch through it and gathered it. Then I just sewed it onto the top of the skirt pieces before sewing them together. Easy!
The finished skirts:
Seriously, these are so easy- you've got to make one!

Wednesday, April 15, 2009

Husband's Old Shirt = Daughter's New Dress

My cousin-in-law, Dana, whom I totally want to be like, made these adorable dresses for her daughter out of men's button front shirts. She posted an awesome tutorial as well. The skill level was easy, so I decided to take a crack at it. They were really easy to make, and this is coming from someone who rarely sews clothes!

I used the measurements that Dana used for her dresses and cut the shirts. However, I forgot to take into account my daughter's huge barrel chest, so they do fit a little snugly. I made the blue one first, using the instructions from the tutorial.
Since I had already cut out the yellow shirt, I thought it would be a good idea to have access to the buttons so I could actually get the thing on my daughter. The blue dress has the sash sewn straight onto the dress and the collar is sewn shut, so no opening the neck. Hmmm. I decided to make the sash separate and tie it around the back in a bow. I still need to add some small belt loops along either side of the dress.

I think I quite like this idea. She can wear it with or without a sash, and I could make different colors of sashes as well. Might be a good idea for a solid white or black shirt dress.
Anyway, these are so fun to make. My husband is lucky he has any shirts left in his closet. I am going to have to find more shirts at thrift stores! Thanks, Dana, for the easy-to-follow instructions and the new obsession!

Friday, November 28, 2008

Freezer Paper Stencils

I have been torn lately because I found some cute ideas for Christmas gifts, but since I need them to be a surprise, I can't post them yet. They aren't Christmas themed, so they will work for any time of the year. I'll post what I've been working on after Christmas!

In the meantime, I tried freezer paper stenciling. My cousin-in-law (I hate that term) is a pro at freezer paper stenciling and has a great tutorial on her blog, so check it out for detailed instructions. Basically, you can create your own stencil for fabric painting with freezer paper, which you can pick up at Walmart or a grocery store.I tried my hand at the stenciling, and although it can be time consuming depending on how intricate your design is, it is pretty fool-proof and therefore, a great project for me!

I decided to do a few pirate-themed skull and crossbones shirts with a few images I got off of Google. Here they are with the stencil still stuck to them.
And here are the finished products! I think they turned out pretty well for my first time. The boy shirt did bleed a little outside of the stencil, but I kind of like the effect!
I also made a few more girl versions in pastel colors and made a matching tutu to go with them. These sets would make great birthday gifts as well. I'll probably be selling these on my Etsy website soon.

Tuesday, September 16, 2008

Birthday Party

This post is long overdue. For the baby's 1st birthday, I made him a little appliqued shirt with the number 1 on it. I got the shirt at Walmart for a few bucks, and the polka dot fabric at JoAnn's. I cut some WonderUnder and ironed the fabric onto the shirt, then did a close zigzag stitch all the way around to secure the applique. Super easy. Don't look too closely- I'm sure there are mistakes!
This party garland was so fun, I might just make one in every color scheme and for every occasion. It was so easy that I pretty much made it while watching my new Office Season 4 DVDs. I picked up some invisible thread and about 6 different patterns of fabric. I think I got 1/4 of a yard each, maybe 1/3. I used this easy pattern from purlbee and cut it all up into shapes. Since it was for a boy's party, I opted for circles (just eye-balled it) instead of the cute flowers. Then I just chain pieced them together, adding the shapes as I went. Soon they were all connected. The great thing about this is that you can cut it to fit your decorating area, and then sew it back together easily if you make a mistake or change your mind and want to keep it long. The bad news is that I got sidetracked setting up for the party, and I forgot to hang the garland! So I will just have to throw another party pretty soon so I can have a reason to use it! I'm sure I'll get plenty of use out of it. I hung the garland up in our dining room to see how it would look. Too bad it's crooked, but you get the idea!

Thursday, September 11, 2008

One Old Pair of Jeans= Two New Jean Skirts

Today I was bored again and found this old pair of jeans that don't fit anymore. I used to love these jeans; they were the jeans I wore on my first date with Peter...but it's funny how styles can change after only 6 years. Nowadays these would be considered frumpy-bottom jeans. So they went in the pile.

I decided that Eden needed some cute jean skirts for Fall, so here we are. This is pretty basic sewing, which (let's face it) is all I can do so far. But I am pretty proud of myself anyway.

I measured and cut the jeans like so:
Then I sewed up the sides and did an elastic waistband. With the A-line skirt, I sewed a scrap of fabric to fold over for the waistband so I didn't have to sew over that big huge seam folded over.
I made one A-line skirt, using the "bells" of the pants, and a straight-legged skirt using the thighs.
All that's left of the pants are these Daisy Dukes!
I just need to wash the straight-legged one so it will fray up. I tried to get some pictures, but the model was a little reluctant! The top two are the straight one, and the bottom two are the A-line.
Now I need to go buy her some boots to wear with these!